
Creating a magnified text illustration in Photoshop
Posted on 10th of February 2011, in Tutorials, by Khalid Majid Ali
Today we’ll learn to create an attractive magnified text illustration. The effect is achieved simply by using some of Photoshop’s filters, so even a novice can get it done in a matter of minutes. The result is quite awesome, so don’t give up reading quite yet.

Resources
For this tutorial we’ll need to download the magnifying glass image form the stock.xchng website. If you don't have an account at stock.xchng, you’ll need to create one, signup is absolutely free and so is the image we’re using.
Other than that, all we’ll need is a system with Adobe Photoshop installed on it and just 10 minutes of your time.
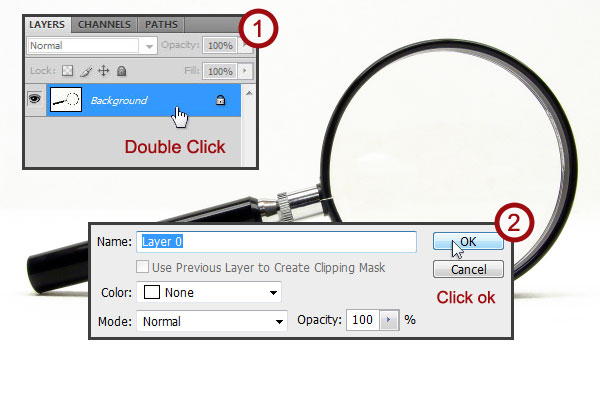
Step 1
First thing is first, open the magnifying glass image in Photoshop. We're going to select the magnifying glass from this image and remove the white background from it. To do this, double click on the locked thumbnail of the magnifying glass to convert it into a new layer.
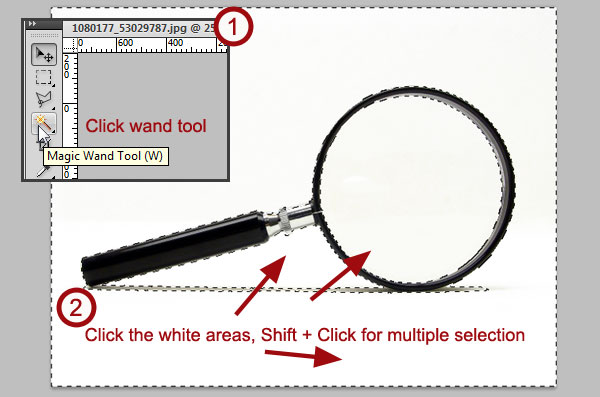
Step 2
Now select the Magic Wand Tool from the tool bar on the left, or simply press W to select the tool. Then click on the white areas of the picture, to select multiple areas, hold the Shift key and click on the multiple areas while the wand tool is selected.
Once you are satisfied that all the major white areas are selected, simply press the Delete key to remove them. Note that the magic wand tool only works great when the area that you're trying to select has solid color and does not have shaded areas.
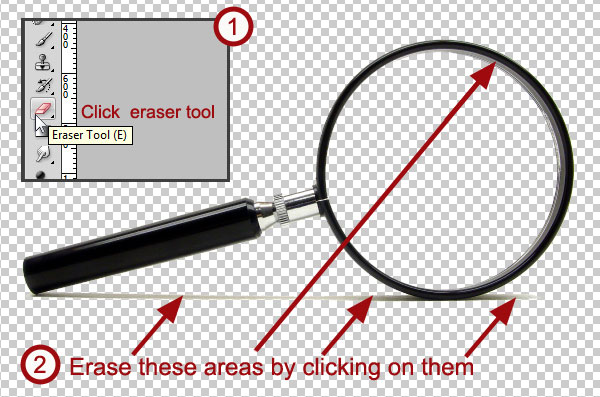
Step 3
Now select the eraser tool from the tool bar or press E to select the tool, and erase the showed areas underneath the magnifying glass, and if you feel like it, from the inside of the circular glass area.
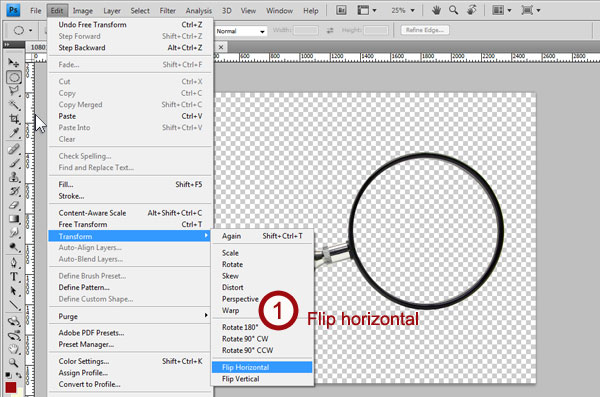
Step 4
Now that we have the magnifying glass on a transparent background, we’ll flip it horizontally. To do that simply click Edit » Transform » Flip Horizontal.
Step 5
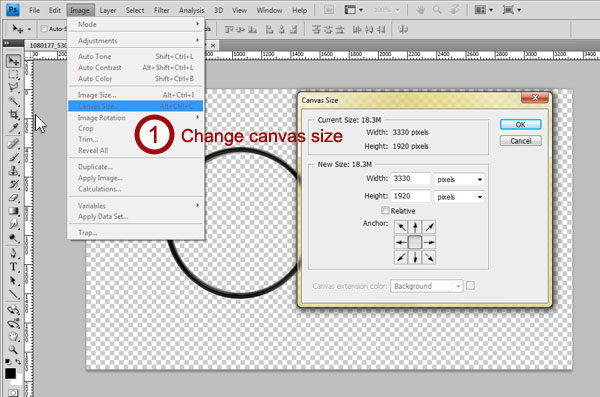
It is time to add the text that we want to magnify, in this example I’ll be using Exabyte Designs’ logo text. As the image we’re working with is quite large the text size I’ll be using will be 515 pt, which is quite large.
For the text to fit nicely on the canvas, we’ll increase the canvas size. To do that, simply click Image » Canvas Size, when the popup opens, enter the desired width and height of the canvas. Over here I've increased the width to 3330 pixels. You can skip this step entirely if you’re text is not as big as the one shown in this example.
Step 6
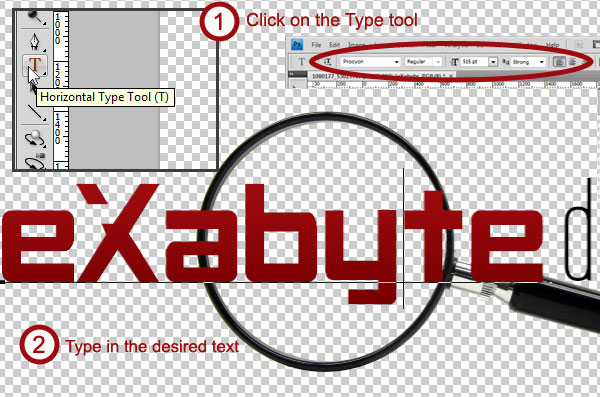
To add a new text layer, click on the Horizontal Type Tool button or press T and click on the canvas. Then type in your desired text; change its font and size accordingly.
Step 7
At this point we add a New Layer which will act as our background. To do that click on the Create a New Layer button in the layers panel as shown in the image, this will create a new layer called Layer 1.
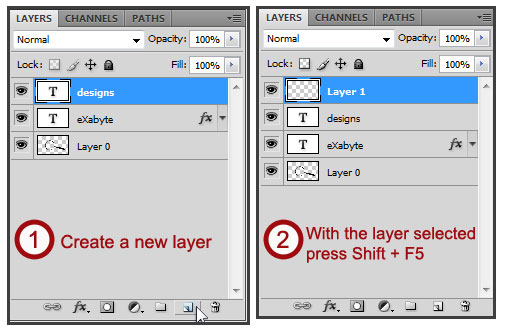
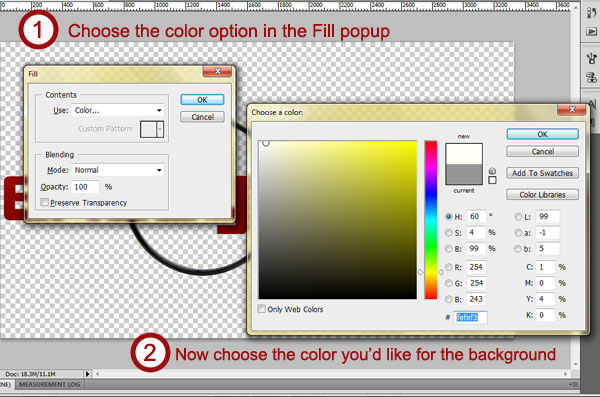
With this layer selected press Shift + F5 to fill the layer, when the popup opens select the Color option from the dropdown menu. This action will open a Color Chooser as shown in the image. I chose #fefef3 as the color for by background. With the desired color selected press ok on the color chooser, and then press ok on the fill popup menu.
Now you won’t be able to see anything on the screen except the color that you chose for the new layer. That’s because the layer is stacked up on top of all other layers. We’ll be re arranging the layers in the next step so don’t sweat!
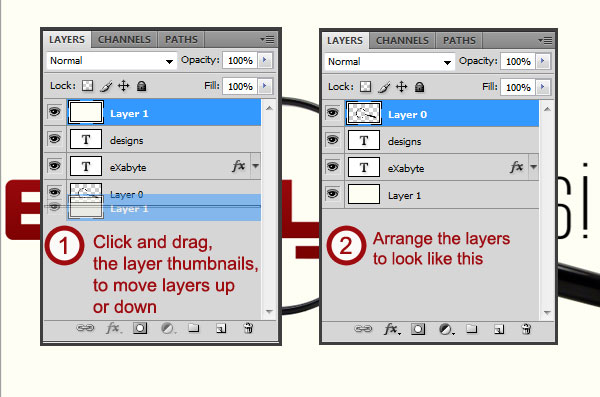
Step 8
To arrange the layers, click and drag their thumbnails in the layers panel, to move them up or down. We’ll move the newly created color layer (Layer 1) all the way to the bottom. While we’re at it, we’ll also move the magnifying glass layer (Layer 0) to the very top.
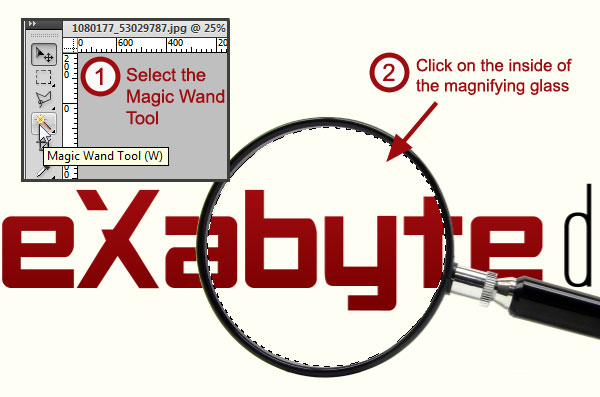
Step 9
Now it is time for the really good stuff! :) To get going, we first have to select the magnifying glass layer and then we select the Magic Wand tool and click on the circular area of the magnifying glass. With this action the circular area inside the magnifying glass will be selected.
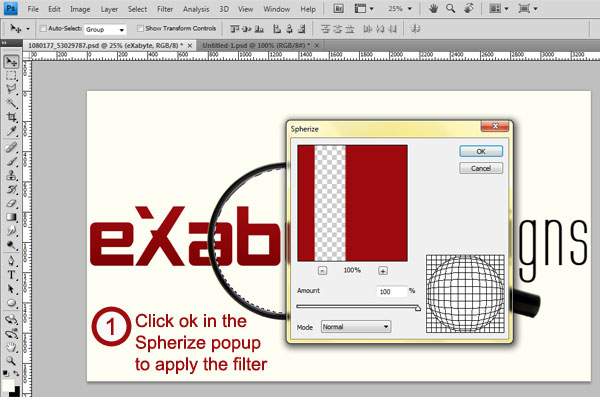
Now we’ll apply the Spherize filter on the text, to do that, first click on the text layer thumbnail, we do this because we have to give this text layer the Spherize filter effect. With the text layer selected press Filters » Distort » Spherize. A popup will appear stating that you need to rasterize the text layer, press ok to that and the layer will be rasterized.
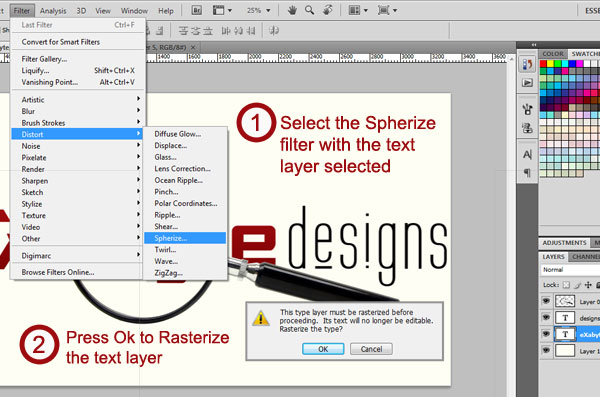
The Sphrize filter window will open, with the amount set to 100% and the mode set to normal, press ok to apply the filter to the text.
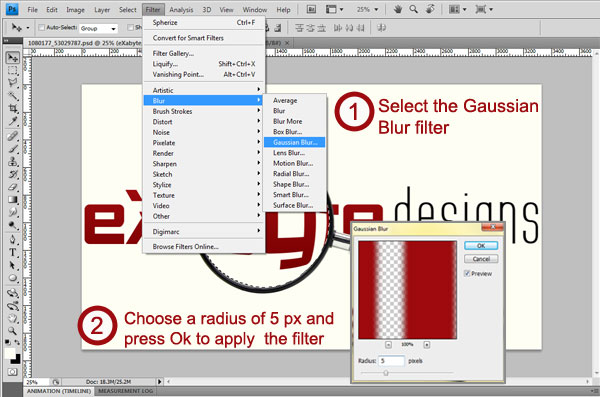
You’ll notice that the circular glass area is still selected, even after the filter is applied, which is good for us. We’ll apply another filter to the selected circular area, this time we'll give it a little blur, by going to Filters » Blur » Gaussian Blur. When the popup opens adjust the radius slider to 5 pixels and press Ok.
Step 10
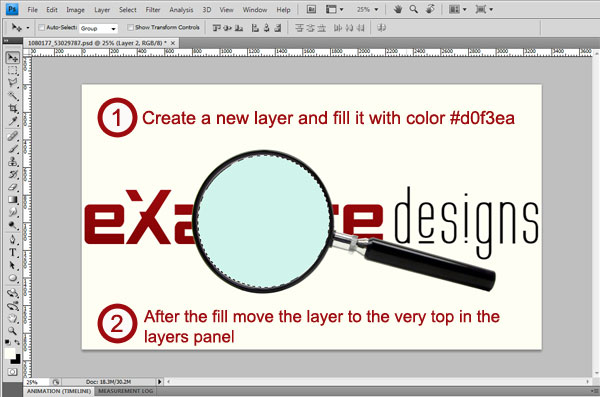
Now that we have some nice little bulging blurred text, we’ll move on to create the actual glass layer. To do that, we’ll create a new layer, and fill it with color. Note that the central circular area of the magnifying glass is still selected, if it isn’t, then you’ll have to select it the same way that we did earlier.
So create a new layer and fill it with color. To do that simply go to Edit » Fill or press Shift + F5. When the popup opens choose color from the dropdown menu and enter in the color code #d0f3ea, after that move this layer to the very top in the layers panel, just like before.
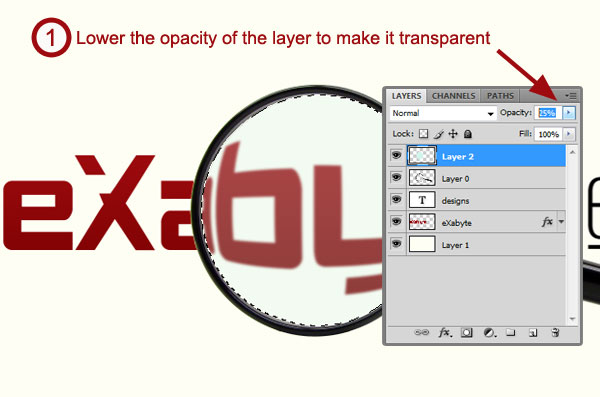
While we’ve got this layer selected, we’ll lower down its opacity to 25%, this will make the layer transparent and will give it a glassy look.
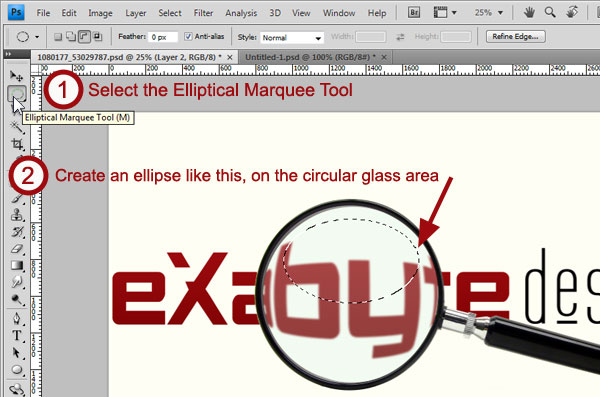
Step 11
To give the glass a bit more oomph, we'll give it some spherical shine. To do that select the Elliptical Marquee Tool or press M and create a selection as shown in the image.
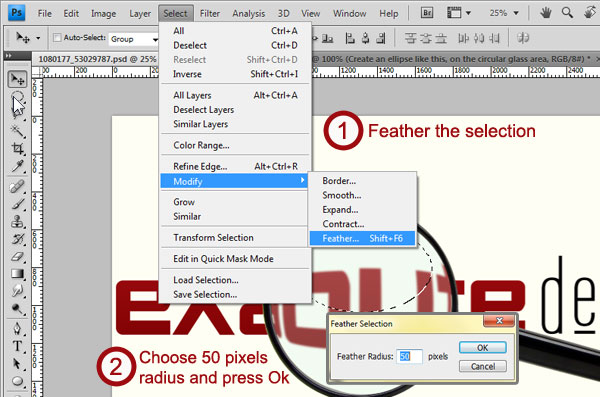
Now with this selection, go to Select » Modify » Feather, when the popup opens, choose a radius of 50px and press Ok. Then create a new layer and stack it on top of all other layers.
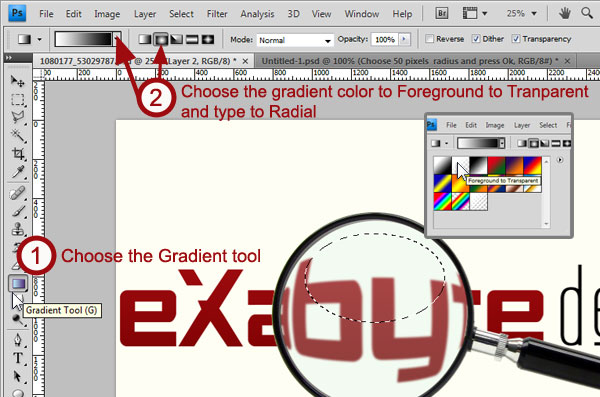
With this feathered selection, choose the Gradient tool or press G. Now click on the gradient type picker from the top left corner of the screen and choose the gradient color which says Foreground to Transparent and set the gradient type as Radial. Then press D to set the Foreground and Background colors to default (Black and White), after that press X to swap the colors so that the Foreground color is now white and the Background color is black.
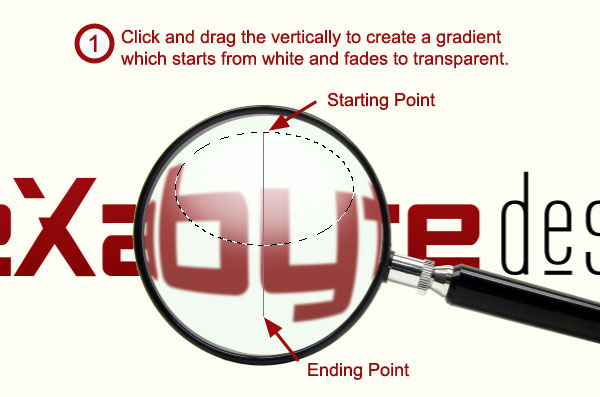
Now create a new layer on top of all other layers and, with the gradient tool selected, click and drag, on the selected elliptical area, vertically to add the gradient.
Step 12
All that is left to do now is to rotate our gradient layer so that it aligns parallel with the lighting on the magnifying glass’ handle. To do that go to Edit » Free Transform or press Ctrl + T (Command + T in Mac). The rotate the layer to about 14.5 degrees, and move it a little towards the right.

To finish things up give your illustration a subtle gradient background and then sit back and enjoy the sight! :)
Conclusion
Today we learnt to use some cool filters and ended up creating a magnified text illustration in Photoshop.
To see what fruit our efforts have brought, view this illustration in action on the Exabyte Designs 404 Error Page. Thank you for reading, hope you liked the tutorial.
Comments
Add a comment
“Every artist dips his brush in his own soul, and paints his own nature into his pictures.
” ~ Henry Ward Beecher


Khalid Majid Ali
10th of February 2011, 12:17 AM
Finally, I've written my very first tutorial! :)
If you find any step difficult to follow, leave a comment about it and your query will be answered soon.
Darakhshan Majid
10th of February 2011, 12:34 AM
Eromytere
4th of March 2011, 3:45 PM
musegreerge
15th of March 2011, 8:29 PM
Zuby Arif
31st of March 2011, 8:41 AM